Halloween Costumes 2012

I’ve been ridiculously busy this last month with lots of stuff!

  • I am starting a lot of new items for my shop Bobbin’ Along
  • I finished up the “busy season” of running.  As some of you know, I’m an AVID runner and finished my second marathon earlier this month!
  • I made Halloween costumes for my girls and a little boy (I posted about this earlier).

If you read in my About Me section on this blog, you know that I started sewing when my first daughter was born.  My first real sewing project was her giraffe costume.  I’ve sewn her costumes and now also my youngest daughter’s costumes ever since.  This year was no exception.  Here was my Halloween story:

If others have 2 girls like me, they may find themselves in a similar situation as I did.

Like last year, I wanted to dress my daughters in coordinating Halloween costumes while both were easily influenced by what I’d like them to be rather than them telling me what they want.  I was trying to figure out a movie or TV show that had 2 girls in it.  It. Is. Tough.  Think about it.

Cinderella?  I’m not making one of my daughters an evil stepsister.

Little Mermaid?  No girl counterpart besides Ursula, and that wouldn’t have been nice when I show them pictures when they are older to say “You were the beautiful mermaid and you were a large, villainous octopus.”

You see my dilemma.

Then came along this new movie Secret of the Wings (a Tinker Bell movie).  Sisters?  Both Fairies?  WOW!  This is exactly what I want!  So with a couple of months before Halloween, I started my plan to convince my oldest to want to be Tinker Bell.  It worked (although it didn’t take a lot of convincing since she loves fairies).

So I went to the fabric store and got everything I needed to make these two fairy costumes.

THEN…my little one become ridiculously obsessed with Elmo.  If anyone has a child around this age, you know that’s not abnormal.  What is with that red puppet?  I haven’t met a kid that doesn’t love him.

After all of that trouble finding a coordinating costume for the girls, I switched everything up.  My littlest became Elmo for Halloween.  I have to say, though, that it was the best decision I could have made.  She LOVES that outfit.  I’m getting a lot of use out of it, though!

Here are pictures of my girls in their costumes.  Not matching, but still adorable (at least to their mother).

Halloween 2012

My Elmo

my Tinkerbell

Have a great Halloween!  It’s kind of my favorite holiday because…IT’S MY BIRTHDAY!  Everyone enjoy trick-or-treating as a celebration of my birthday.  It’s not for any other reason than a party for me, right??? haha

Also, check out my facebook page www.facebook.com/bobbinalonggifts if you want an Elmo onesie like my littlest is wearing.  It’s not just for a costume!

Brobee Costume

I’m just popping in quickly to show you a REALLY exciting costume that I had the opportunity to make.

My oldest goes to preschool with a girl who has a little brother with a broken femur.  He is in a cast from his chest to his knees.  Poor little boy can’t put regular pants on and is stuck basically on his back for 5-6 weeks.  This all happened – of course – around the time of Halloween, when EVERY kid runs around from house to house collecting candy.

His mother was telling me about their experience at the hospital.  They were going to make the cast in Packer’s colors. and it turned out to look more like Brobee from Yo Gabba Gabba.

Anyone would be pretty upset with having to have a large cast on for so long; a little kid with mounds of energy should be more frustrated!  This is not the case with this little guy.  He is all smiles!  Lots of family and friends have been visiting him and helping him pass the time.

How do I come into the picture?  SEWING!  I spoke with his mom about the challenges he has with his cast and his love for his new “twin” Brobee.  I wanted to make sure he could enjoy Halloween with his brother and sister without feeling left out of the fun of dressing up.  Let’s be real, store-bought costumes aren’t well made in the first place, so it is doubtful that his mom would have been able to find a costume to accommodate his cast.

I’m not sure if there is a pattern for a Brobee costume out there.  I didn’t look.  So in case anyone wants to know how to alter a regular pattern to make a costume, I’ll tell you some tips:

  • I took a McCall’s pattern for sweatpants and a jacket.  If you can’t find a plain shirt or pants in the color of the costume, you can easily make your own.  Don’t spend too much on a pattern unless you are going to use it a ton of times.  I don’t love to use patterns, so when I do, I won’t pay more than $1-$2 for the pattern.  Lots of places have sales on patterns and all brands have similar patterns.
  • I had to make the fabric because I wanted it in fleece and they didn’t have Brobee colored striped fleece.  I took a couple of yards of both colors, cut it in strips and sewed them all together to make one large piece before cutting out my pattern.
  • If you have stripes like I did, make sure when you cut your pattern out, you are fully aware of where the seams are going to meet so that the stripes match up.  I accidentally off-centered one pattern piece and it was a little off.
  • I needed to make “tear-away” pants instead of regular sweatpants because he couldn’t close his legs.  Instead of sewing the seams on the outside of the legs (like the pattern suggested), I used velcro so it can open on the sides.  This makes it much easier to put on and take off.
  • I added a hat with a face using felt.  it really finished off the costume.  Honestly, that was my favorite part of the costume.  You can even use the hat for winter!

    close up of hat

Here are some pictures of this awesome boy and his new Halloween costume.

Brobee fan all dressed up

TWINS! Dressed up as Brobee with a Brobee stuffed toy

I enjoyed making this because I know that his mom doesn’t have to worry about searching for a costume to make sure his Halloween can be as exciting as it should be.  Also, the look on his face when he tried it on was priceless.  He is seriously one of the sweetest little boys ever.  I hope he has a good time trick-or-treating.  I’d be happy to share his candy with him! 😉

National Sewing Month

September is National Sewing Month!  As you can tell by my exclamation mark, I’m pretty excited.

I. adore. sewing.

It puts me into my own world where I’m not concerned about the dishes, laundry, or messes that have accumulated around every corner of my house.

I sit down at my sewing machine, and I work on a project that I’ve had my eye on and lose myself in it for 10 minutes to a couple of hours, depending on how willing my children are to play nicely that day.

So in celebration of National Sewing Month, here are some of the projects that I hope to accomplish:

  • Halloween costumes for my daughters (yes…I know it’s a month and a half away.  If you have ever tried to sew costumes for your child when your child is present, it DOES takes a month…now add another costume to the mix…you see why I’m starting early.  I most likely will finish these by October 30th)

    Halloween 2011

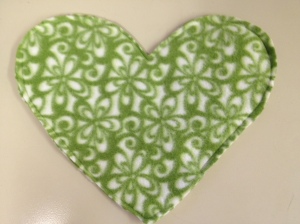
  • More hearts for one of my favorite charities A Heart to Hold that sends weighted hearts to families going through pregnancy and infant loss

    Sewn Heart

  • I have a couple of craft fairs coming up, so I get to make TONS of little onesies to hopefully share with lots of people!

In the middle of all of that, I really want to help you all with some basic sewing techniques so that I can help newbies learn how to sew with me!

Have fun with your projects.  JoAnn Fabrics is having weekly sales on different fabrics, so check them out.  At the end of the month they are having a HUGE coupon commotion, so you know where I’ll be!

Purse Pocket Shirt Tutorial

I find a great deal of inspiration for my sewing projects from searching through clothing sites online. I’ve noticed that I can make an article of clothing myself for cheaper than you can find it online most of the time. This is the case in this tutorial for a Purse Pocket Shirt. I found a shirt with an appliqué that looked like a purse from Kettle of Fish Clothing.  I thought that was really cute but that I could make it easily and for cheaper than $74.  If you find it equally as cute, here is my shirt and how I did it.

my lady bug in her purse pocket shirt

NOTE: I will be hand-sewing some of this because, to me, it’s easier.  If someone has a tip on how to machine sew some of these things, let me know.  I’m always looking for shortcuts!

MATERIALS

  • Shirt (if you buy short sleeves, I’ve also added how to add sleeves to look like it’s a layered shirt)
  • 1/4 yard of fabric (you could use only 1/8 yard if you aren’t doing sleeves)
  • Ribbon/Rick Rack in matching color
  • Thread in matching color (I actually did it in a contrasting color, though)
  • 1 button

I included a pattern for the purse because it was much easier than explaining. If you need the purse bigger or smaller, it’d be simple to enlarge the pattern slightly. This purse is for a size 2T shirt.

MEASURING AND CUTTING

**If you are doing sleeves do this step, otherwise go to next step.  Measure the length of a sleeve for your child.  Make sure you start from the corner of the shoulder (usually if you take a long sleeved shirt that your child already has, just start from the seam of the shoulder and sleeve) and measure to the wrist.  Subtract the length of the short sleeve that you will be attaching the layered sleeve to get your finished length.  I got 6 inches.  I did not use elastic to keep the sleeve tight at the wrist because I like to pull up my kid’s sleeves when she plays with dirty things and then I don’t leave little marks on her chubby arms when I roll them down.  Therefore I only added 1/2″ for seam allowance, equaling 6.5″.  Then I took the diameter of the hole in the arm of the shirt (in my case 4 inches).  I added 1/2″ for seam allowance-4.5″.  **

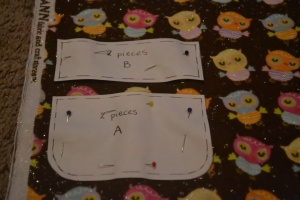
Fold fabric in half, selvage to selvage. Pin and cut the two pattern pieces A & B on the fabric so that when you are done cutting you have two pieces of each part.  These will be your purse pocket.

patterns pinned on folded fabric

cut out pocket pieces

Measure your sleeves also at this time.  I measured a rectangle of 6.5″ by 4.5″.  I did this twice on the folded fabric (therefore having 4 rectangles total).

SEWING TIME

Purse Pockets

  1. Face the 2 matching pieces together and pin for both parts A & B with nice sides facing each other.

    pinned with nice sides facing in

  2. Sew, leaving 1/4″ seam allowance.  Leave one side open (smallest side to make it easier on yourself) so that you can turn it inside out.

    sewn pocket pieces with an opening

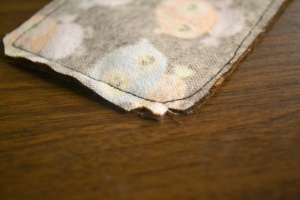
  3. I like to cut notches in the corners so that it makes a cleaner edge when it is turned around.

    cut notches in corners

  4. Turn parts inside out so now you see the nice sides.
  5. Thread a needle with the thread you used for your pocket.  You will be hand-sewing these closed.  In order to “blind stitch” this closed (where you don’t see the stitches), I start on the inside in order to hide the knot I made at the end of the thread.  I then fold the cut edges in so that it matches the look of the other seams in the piece.  I usually use my fingernails to press the folded edges.  I then use a running stitch and go from side to side, alternating, stitching just below the folded edge on each side.  Pull the thread as you go and you will either not see the stitches or BARELY see them.  That’s good!  Just don’t pull the thread too tightly or it will bunch the fabric.
  6. Finish it when you get to the end by grabbing a little part of the inside of the seam, as you are pulling the thread through, weave the needle through the loop your thread has made in order to form a knot.  I usually do this twice as a double loop to give it a little extra stability.  Cut off extra thread.
  7. Place parts A & B on your shirt close to the bottom side of the shirt (I placed in a diagonal).  Pin in place.
  8. I added a button on part B and a loop on Part A.  To see how to do a loop, look at this tutorial on sewn button loops.  Just make sure you line up where you want your pockets before putting on the button and loop (which is why I had you pin it on the shirt first), because otherwise it might not be perfectly aligned and unable to close.

    pin purse on shirt

Purse Straps

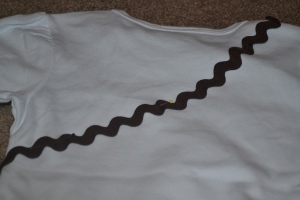
Start from the top corner of the top flap that is pinned to your shirt.  Pin the corner of the ribbon.  Then drape the ribbon across the shirt, over the shoulder, around the back, and then back to the other corner of the top flap.  This should look like the straps of a purse.  I play around with the ribbon to make sure it is lying the way I want it to and then pin it to the shirt.  I use a lot of pins so it stays where I want it.

pin ribbon on shirt to look like straps of purse

back of shirt – ribbon pinned to look like purse strap

Keep the purse pinned to the shirt still.  Now sew the strap on the shirt.  I go slowly so that the ribbon stays in place and I don’t bunch the shirt up as I sew.

Sewing Purse

I sew the top flap of the purse first.  I double check that the ribbon strap ends will be sewn into the top flap.  In order to cleanly finish the ribbon off would be to fold in the ends so that when it is sewn in place, you will not get any frayed edges.  Then I only sew the top side of the flap in order for it to open and close.  I straight stitch it with the sewing machine as close to the edge as possible (1/8″ to 1/4″ depending on how confident you feel about staying straight and on the fabric).  When you are done sewing, the ends of the ribbon should be under the flap.

straps sewn – top flap of purse pinned

keeping top flap aligned while sewing it on shirt

Now make sure that the bottom is still lined up with the top flap.  This time you will sew 3 sides, leaving the top side open so you can put your hand in like a pocket.

sewn bottom with top left open for pocket

You are done with the purse!

OPTIONAL SLEEVES

I thought this shirt might be cuter if I added sleeves.  This way it gives it a more store bought look.  I didn’t exactly do it the way that I am telling you how to, but after messing with this sleeve, I realized a more simple way.

  1. Take all four pieces and zigzag stitch all four sides on each.  I say this so you don’t have to worry about doing a rolled hem at the ends of the sleeves.
  2. Pin 2 rectangles together on the long sides with nice sides facing in.  If you have a pattern like I have, make sure the patterns are aligned.  I made sure my owls were all facing the same direction.  Now stitch along the sides with a 1/4″ seam allowance.  This will create the sleeves.

    pinned along sides

  3. Repeat with the other pieces to form 2 sleeves.
  4. Fold 3/8″ on the bottom of each sleeve and finger nail press it so you create a hem.
  5. Pin the hem in place.
  6. Sew 1/4″ hem on each sleeve.

    finished sleeves before put on shirt

  7. Pin top of sleeve to the sleeve of the tshirt.  To do this I turned both sleeve and shirt inside out.  I evenly pinned the top of the sleeve to the bottom of the tshirt sleeve starting with the seams on both, going around the sleeve.  Turn it back around to make sure it is even with the pattern.

    pinned sleeve to shirt

  8. I take a needle and thread (preferable the same color thread as your shirt) and hand sew in a straight stitch all around the sleeve.  I did my best to hide the stitch underneath the hem of the shirt.  Knot it at the end just like you did above with the blind stitch sewing above.

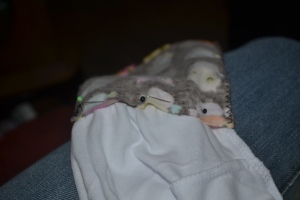
    sew under hem of shirt to hide stitches

  9. Repeat on the other sleeve.

    finished sleeve

All done!

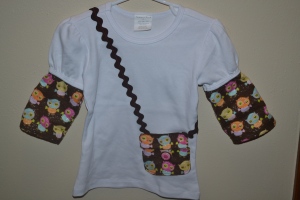
finished shirt

I put it on my little lady bug and got SO many compliments!  She had fun with it, too!  I found little toys in it when I took it off of her in the evening.

As with all of my tutorials, if you are intimidated by this or don’t have as much time as you’d like to make it, I will make it for you!  Just visit my site Bobbin’ Along on Facebook @ www.facebook.com/bobbinalonggifts.

Happy sewing!

Back to Basics

I strive to help those that sew on a novice and intermediate level work their way through each of my projects with explaining various techniques that I use.  Through doing each tutorial, I realize that I might have to constantly explain various techniques.  I don’t want anyone to get frustrated with not knowing how to do something, while others may think that they are simple steps that don’t need tutorials.  When you are starting off, nothing is simple.  It does get easier, though!

Wouldn’t it be nice if we could all be in our bed sewing like actress Maureen O’Hara? (from LIFE)

In order to not repeat myself constantly for the intermediate sewer but also to help the newbies, I will be making tutorials on basics such as sewing a rolled hem, waistbands, and shirring that you will be able to look back on when you have questions.  You can find these in my SEWING BASICS tab at the top of my page.  I will also attach links along my posts to make it easy to get to the specific tutorial I’m speaking about.

I will still explain each step thoroughly, but I think if you follow me for more than one project, you would be bored with me constantly explaining certain techniques that I prefer to use frequently.

Please let me know if you would like me to add a “basic” technique to my list as I’m here to help you.  We are here for each other!

Funny Child Oufit

20120730-173157.jpg

One of the movies that I always catch myself watching when it is on tv is Dirty Dancing. I had to have a little fun crafting, so I made this onesie for my littlest. She wasn’t fond of me taking her picture, but I think that made it even cuter!

If you are interested in this funny onesie, visit my Facebook page Bobbin’ Along!


Sundress Tutorial

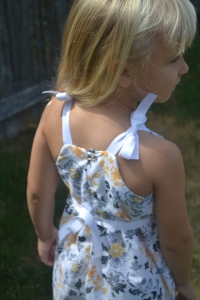
After making my shirred, pocket skirt my prima ballerina begged for me to make her an outfit. Of course, it was always something I was going to do, but she kept at it every day…”Mom!! Make me a dress!!!”

I thought about what would be a good dress to make and explain here, so I’m going to make a simple sundress with buttons on the back and ties to tighten at the waist. This will be an easy dress to make for relatively new sewers. It didn’t take long to make it, and it turned out super cute.

my oldest in her new dress

my oldest in her new dress

My daughter wears size 6 in girls, so I’ll be going off of that, but here is a link to measurements for all sorts of sizes. The only thing it doesn’t include is the length of the dress, and for that I just measured from her shoulder to where I wanted the dress to end-just below her knee.

MATERIALS

  •  1 1/4 yard of fabric
  •  5/8″ ribbon in coordinating color of fabric
  •  Double fold bias tape in same color as ribbon
  •  Thread
  •  2 buttons

MEASUREMENTS AND CUTS

Bodice

  1. I took a dress she currently has, and I measured the bodice height. It came out to 6″ finished. I like using current clothing to help me find what will fit my children. Add 1 inch for seam allowance, so I have 7″.
  2. I took my girl’s chest measurement (from the chart) and got 22″ and added 1 inch for seam allowance-giving me 23″.
  3. I cut out 2 rectangle pieces at 7″ x 23″.

Skirt part

  1. I took her waist measurement (26″) and multiplied by 1.5 so that I can have a gathered effect on the skirt part making 39″.
  2. I measured from her shoulder to just below the knee which was 25″. Because we are doing straps, I subtracted 2″, making the end length 23″.
  3. Since I will be using bias tape for the hem, I don’t need to add anything for the bottom hem, but I added a half inch for the top seam that meets with the bodice.
  4. The height of the skirt will be 17.5″ because I took the total finished length 23, subtracted the bodice finished length 6″, and added half an inch for seam allowance = 17.5″.
  5. Now I measure and cut one rectangle 17.5″ x 39″.
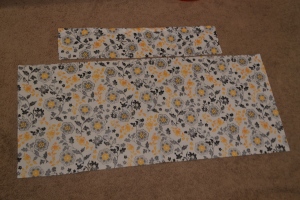
cut fabric

cut fabric

Ribbon

  1. Cut 1 length of ribbon at 44″. This will be for the waistband.
  2. Cut 4 lengths of ribbon at 10-12″.  This will be for the straps and will be tied like a bow, so if you want bigger bows, cut 12″.

“PREPPING”

Skirt

  1. Pin bias tape on the bottom hem

    pinned bias tape hem

    pinned bias tape hem

  2. Sew hem
  3. With nice sides facing in (you see bad side), pin sides together so that the skirt is closed and the bias tape hem is on the bottom. Sew side using zig zag stitch.

    side of skirt pinned with bias tape hem on bottom

    side of skirt pinned with bias tape hem on bottom

Bodice

  1. Face the nice sides of the fabric towards each other.
  2. I started in the middle of the pieces on the top.  This will be the front center of the bodice.  Since I decided to have the top of the front be 6 inches finished, I measured 3 1/4″ on either side (included 1/4″ seam allowance).
  3. I then went on both sides and measured 3 1/2″.

    bodice measurements (yellow is the fabric)

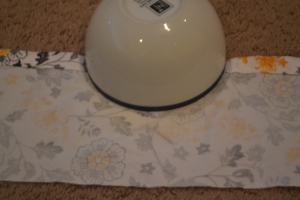
  4. With the arm holes, I took a bowl (or you could do a cup if you need smaller circles) and made a semi circle between the two measurements.  I repeated the same on the other side to get the other arm hole.

    bowl for arm holes

    bowl for arm holes

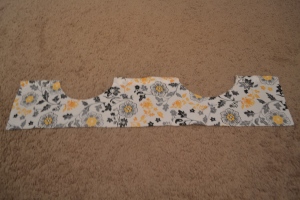
  5. Cut fabric.

    bodice pieces cut out

    bodice pieces cut out

  6. Pin fabric, leaving the bottom open (this will be attached to the skirt).
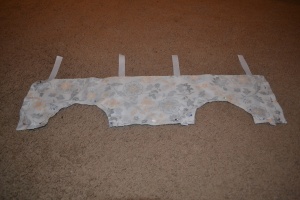
  7. Take the 4@10-12″ ribbons.  These will be the shoulder straps.  Put them inside the two pieces of fabric because once you sew them on, they will be shown with the “nice sides”.  As shown in the picture, two of the strips are in the middle for the front, and one of the strips are on either side that will end as the back straps.  Pin these so they are straight up and down and will be sewn into the seam.  I like to put the ribbon a little further from the seam so that it gives a square look to the top. You can see in the close up picture of my daughter the squared edges when you put the ribbons further from the seam.
    bodice with ribbon straps pinned

    bodice with ribbon straps pinned

    my beauty

    squared edges on top

  8. Sew seams at 1/4″.
  9. Flip inside out and you will see the straps coming out of the fabric.

COMBINING

  1. Gather skirt.  This can be done several ways.  I tend to do these by hand, using a running stitch.  This basically means take the needle and thread and go over and under the fabric in a straight line, leaving a length of thread on both ends so that you can pull it to gather it.  You can also do this with your sewing machine using a “straight stitch” and just make sure you give yourself a lot of thread to pull it.
  2. Pin the gathered skirt to the bodice.  Match the seam of the skirt with the sides of the bodice (the sides with come together with buttons later).  You can pull the thread or loosen it to make sure that it is evenly gathered while pinning it to the bodice.  Make sure you pin the skirt with the nice side on the inside so the seam is kidden when you sew.

    skirt gathered and pinned to bodice

    skirt gathered and pinned to bodice

  3. Sew in a zig zag stitch to give your skirt more reinforcement.

FINISHING TOUCHES

Waistband and Straps

  1. Fold the ribbon in half so that you can find the center.  Then pin the center on the front of the bodice in its center just about of the seam between the bodice and the skirt so that the bottom of the ribbon is slightly hiding the seam.
  2. Pin the ribbon to ONLY the front so that you will leave the ribbon loose on the sides and back to tie later.  You can do this by lying your dress flat and don’t pin the ribbon down on the back of the dress.
  3. Starting on the side, sew as close to the edge of the ribbon as possible.  Sew in a rectangle on the ribbon.  HINT: When you want to turn your fabric, turn the knob to put the needle down into the fabric.  This way when you lift the presser foot lever, you won’t lose your spot in your sewing.
  4. I then took a lighter and finished off all the ribbon edges that I cut.  To do this, you hold the ribbon in one hand and take a lighter back and forth across the edge (without letting the flame hit the ribbon so that it doesn’t melt the whole thing).  This creates seal to the edges so they don’t fray.

Buttons

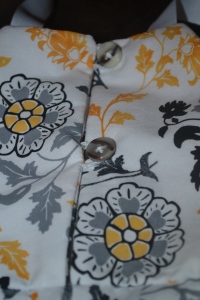
Honestly, I was too intimidated to try to make a button hole with my sewing machine, so for this project I used a technique that I found on the website ysolda.com.  She gave a great tutorial, so I want to give her credit for this sewn button loop tutorial.  Then I hand sewed two buttons on the opposite side.buttons on back

THAT’S IT!  Here are a few pictures of my cutie pie wearing the dress.

my beauty

back with waist and shoulder straps tiedmy oldest in her new dress

Once I finished the sundress, my daughter immediately tried it on and danced around the room.  This is how she gets to be known as my Prima Ballerina.  Let me know what you think and if you’ve tried it yourself!

Shirred Pocket Skirt

I’m VERY excited to bring a new series of posts called “3 yards, 3 outfits” involving some awesome fabric that I found at JoAnn Fabrics.  This whole idea started when I was browsing through the store, trying to find an adult patterned fabric to make myself an outfit.  I don’t often buy myself clothes.  I overly obsess about my children’s wardrobe and all the cute things they get to wear.  Meanwhile, I still have shirts from my high school days.  I love looking on pinterest at the outfits people pin, and I know my wardrobe contains almost nothing in comparison.  I don’t have matching bracelets that go with my shoes or that cute pair of jeans with that slimming top that can go from office to party with just an added accessory or two.  I’m happy when I get out of the house with my hair brushed some days.

Anyways, I bought 3 yards of this very cute fabric, and I’m going to attempt to make 3 outfits (although, I am still a mom…so of course 2 of the outfits are for my girls).

I wanted to start this sewing series with something for me.  I promise for anyone who wants to make something for their child…it’s coming.  But today, momma wants a new skirt.  I love the clothing from Anthropologie.  They always seem to have flowy clothes that are really comfortable but at the same time beautiful.  I saw this skirt that has pockets and fell in love with the ease of it (although not a huge fan of the pattern or the prices from this place as most of their skirts are over $100.)  I’m a huge fan of pockets because I always carry my phone with me, but my littlest is in her “always wants to be held” phase, leaving me without a hand to do anything else.  It also has shirring at the waistband, which 1)makes it super comfortable and 2)I’ve always wanted to try on my sewing machine.  So this is my first uncharted territory project!  So let’s start!
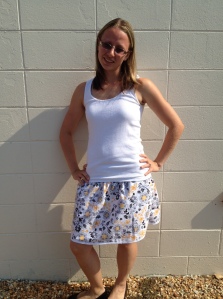
me in my shirred skirt

This is what I used for this project:

– 1 1/2 yard of the fabric of your choice

-matching thread

-shirring thread

-elastic (either 3/8″ or 1/2″…I used 1/2″ because I have a ton of it)

*OPTIONAL* bias tape (double fold) in either matching or contrasting color (I personally LOVE this skirt with bias tape so I recommend it)

MEASUREMENT MATH:

To get the width of your skirt you have to do a little math, but I promise it won’t be hard:

Measure around your hip (mine was 28 inches) x 1.75 = the width of the skirt before it is shirred (I got 49 inches)

Now divide that number by two because you are going to cut out two pieces 49 / 2 = 24.5 inches

I’m going to make a skirt that’s approximately 19 inches finished, so I’m going to cut the length of the fabric to 21 inches.

Also, if I haven’t said this enough, I don’t like to buy patterns.  If it’s an easy outfit, I find it simple to eyeball a lot of it with a little extra fabric to play with if I didn’t quite get it right the first time, so here is what you do for the pockets (I’ll just label this Pattern Part A):

  • Get 2 pieces of paper and tape them together so that it’s longer not wider
  • put your hand on the paper up to almost your elbow with your thumb out (unless you are going for a much shorter skirt, in which you would measure to the middle of your arm)
  • trace around your hand  allowing a good inch or so for what will be a seam allowance – once you get to your thumb, just go across and don’t trace around your wrist (you really only need a half inch because you are using the thumb part in your side seam, but it’s okay if it’s more).

    Pattern Part A

CUTTING TIME:

  • Cut 2 rectangles 21″ (height of skirt) by 24.5″ (width of skirt)

    my awesome fabric cut in 2 pieces 22″ by 24.5″

  • 4 pocket pieces (I just folded my fabric in half and cut twice – this will give you both pocket sides)

So you have all the fabric you will need.  Now it’s time to get this skirt started!

Once I’ve cut my pockets, I take the same pocket “pattern” and do a little altering to it to give me a pattern for the holes of the pockets.  Take you hand on the corner of the pocket and trace your hand in a curved line.  You want to make sure your hand fits in your pocket, so this is why I don’t use a set pattern.  I called this Pattern Part B.  Cut out that piece of your pattern.

Cut out pocket opening pattern

Now make two cuts on one side of your rectangles (this will be the front of your skirt).

front fabric piece with pocket holes cut out

Next, cut the pocket holes out of two of the pocket pieces.  I make sure I have the pockets semi assembled (making sure the patterns are facing each other)  so I don’t cut the wrong pieces.

Pockets with Pattern Part B cut out of front for pocket hole

Cutting is done!

SEWING TIME:

  1. Pin then sew the pockets together first.  Make sure that the patterns are facing each other.  Sew along the edge like shown in the picture.  Finish with a zigzag stitch to make the pockets reinforced.
  2. Now pin and sew the pockets to the front of the dress.  I’m using bias tape, so I’m not worrying about the edge.  If you aren’t using bias tape, you need to flip the pockets and front of dress.  Here are pictures of both ways:

    pinned for bias tape

    pinned for without bias tape

  3. Then I pinned the bias tape and sewed the double fold bias tape around the pocket seams.

    finished pocket edge with bias tape

  4. Baste the pockets so that it lays flat and doesn’t come apart when you are doing next steps.
  5. I hemmed my dress on the bottom with bias tape for a little “decoration.”  I really like how this looks, and then I don’t have to deal with a rolled hem.  I did this before putting the two rectangles together.  It makes it a lot easier, believe me.
  6. Put the two rectangles together (nice sides facing in) and sew side seams with a 1/2″ seam allowance and then zigzag stitch for reinforcement.
  7. Sew top of skirt for your elastic.  Do this by creating a rolled hem (I’ve explained it in a previous tutorial for a pillowcase dress I made) large enough to fit your elastic band (mine is 1/2″ elastic so I created a 3/4″ space and then hem 1/4″ from the edge to create a 5/8″ hole for my elastic.  Make sure to leave a 1 to 2″ hole to thread the elastic through.
  8. Shirred waistband (I’m excited to try this part so I’m going to go into this more in depth)

SHIRRED WAISTBAND:

I was very interested in learning how to sew a shirred waistband (or just shirr in general).  I looked up a ton of tutorials, and it seems super easy.  So here are the steps:

  1. ELASTIC THREAD! This is the main “ingredient” in shirring.  You can find it in the notions section in a little package.
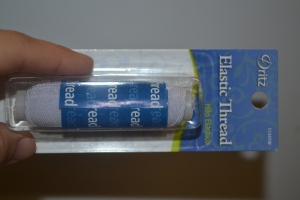
    elastic thread

  2. Wind the bobbin.  You have to do this by hand because…well, you do.  I am not sure why, but everyone said to do it.  I can assume one of two things.  Either your machine can’t do it because the thread is much thicker than normal thread or if your machine can wind it for you, it will be too stretched out and not work when you are sewing it.  So unfortunately, we do it by hand.  You want to wind it without stretching it a lot because when you are sewing, it will naturally stretch.
  3. Keep the normal thread on the top and use the elastic on the bottom (so you will only see the elastic on one side).  Make sure you sew with the the elastic on the back, though!

    elastic thread wound on bobbin in machine

    shirring fabric (note: elastic thread on underside of fabric with regular thread on top)

  4. Do not change the tension on your machine!  Step away from the tension!  It will be fine.
  5. I increased my stitch length up a bit.  I think it’d be a little easier to sew when it’s around a 3.0 or so.
  6. Shirr in a spiral for waistbands.  The nice thing about it being a skirt already is that you can keep going around and around without stopping and starting over and over again!  Start at the top, just below the elastic casing.  Use that edge as a guideline and keep each row about 1/4″ apart (I like to use the edge on my presser foot as my guide).
  7. Sew approximately 8-10 rows
  8. Finish sewing like normal (at a side seam preferably)

    nice side of shirred fabric with 8 rows 1/4″ apart

    wrong side of fabric with shirring (you can see elastic thread on this side)

Insert the elastic.  Measure elastic to what your waist measurement was from above (mine was 28).  Give yourself an extra inch for sewing them together.  So I cut my elastic to 29″.  I used a safety pin to thread my elastic through the whole in the top, above the shirred waistband, making sure that I held on to the end of the elastic so it didn’t get lost in the hole.  Once you’ve gotten through the hold and are holding both ends of the elastic, sew them together.  Now sew the hole shut.

elastic fed through hole with safety pin

DONE!  It seemed like a lot of instructions, but it didn’t take very long to make.  I have a feeling I will be making a lot of these.  If not for me, than for friends or family (or my little kiddos).  I had fun shirring as well!  I have a feeling there will be some more shirring tutorials in my future!  I hope you all found my instructions easy to understand because not only is this able to give you the freedom to pick a patterned fabric that you love, I saved about $90 making this myself!

“Fourth of July” Layered Cake

Another holiday is coming up…Independence Day!

We have always celebrated the fourth of July by going down to the lake at night and watching the fireworks and having a cookout with friends or family. This year, I wanted to do something special to celebrate. I saw this cake on a blog called 17 and Baking. I liked the original idea of the cake, but I wanted to change it up a bit.

**DISCLAIMER** I, by no means, am a professional baker. I know I said this when I made my Tangled Tower Cake, but I just want to make everyone aware that you don’t need to be a fancy baker to do what I’m going to do. I don’t have any fancy tools. I make do with what I have in my house.

Here is the finished product:

Finished Flag Cake

ITEMS NEEDED:

  • 9 inch baking pan (4 would be best, but if you don’t have that many, just reuse the ones you have…it’ll just take a little longer…that’s what I did)
  • 2 boxed packages of white cake
  • 3 standard tubs of white frosting
  • long piece of string/floss
  • food coloring

Time to bake! I mixed up the first box of white cake. I added red food coloring. I used TONS of food coloring, but it seemed to stay a little pink. I have never worked with red velvet cake, so I didn’t want to start now. Maybe this would provide a more red color, but I think my red turned out okay. I divided the batter into two 9 inch baking pans and baked as directed on the package. TIP: I spray the pans with cooking spray and dust with flour to make it easier on myself to get it out of the pan once cooked.

Once out of the oven, I cooled it and took it out of the pan.

In the second box I mixed, I split into two bowls, and mixed one with blue food coloring and and the other with red.

3 red pans, 1 blue

I then wrapped all of the cakes in saran wrap and put them in the fridge to really cool off. I left mine overnight because I didn’t have time to do this all in one sitting. Gotta love being a busy mom!

Once out of the refrigerator, I had to cut the red cakes in half (so I had a total of 6 red layers). Instead of spending money on a cake cutter that I would most likely never use again, I learned a little trick from my mother.

  • Take a piece of string or floss
  • Carefully wrap the string around the cake, making sure to be in the middle and even around the cake
  • Cross the string

    Crossing the string

  • Pull evenly as if you were tightening a knot (don’t worry if you feel like you are smushing the cake, you won’t)
  • Once it has gone through the whole cake, just pull the string out from one side
  • It’s cut evenly!

    cut layers

Now it’s time to cut the blue cake! For this I used one of my coffee mugs that happened to be about 4 inches in diameter. If you have a round cookie cutter that size, it would work as well. I put the cup on the edge of the cake so that I could get two circles out of one cake. I just cut around using the cup as a template.

cup for circle template

Next I needed to cut a hole in the red cakes to make room for the blue circle insert. I placed the cut blue cake in the middle of the top of the 3 layers that I needed to cut. I then just cut around the blue cake as a template, making sure to go through all 3 layers.

cutting 3 layers of red for blue insert

ICING TIME!

Do 3 layers of red cake with white frosting in between. The thicker the better to get more even looking “stripes,” but I used 3 regular tubs of frosting, and I didn’t put a super thick layer in between because I knew this thing was going to be sweet already.

red layers with white frosting in between

Once I finished 3 layers, I layered the next 3 with the hole in the middle. I put the blue cake in the middle so that I didn’t over frost and not leave enough space for the cake to be inserted later. I just put both blue circles together with a REALLY small amount of frosting to more or less “glue” them together.

layering with blue cake in middle

When I finished all 6 layers, there was a small amount of blue sticking out at the top. I just used the string again to even it all out.

all layers on with blue in middle

Then I just frosted the entire cake with the white frosting. Like the other blogger did with her cake, I just left it plain and white. I like the idea of not decorating the outside since the inside is what is special about the cake.

frosted cake

As far as difficulty in creating this cake, I think it was actually quite simple. The main thing to remember is to keep the cakes cool so frosting it is easier.

Cutting a piece of this cake is the best part!

cutting the cake!

piece of the flag cake

I hope this is as big of a hit at our holiday get together as it is to me. And if it isn’t…I get a 6 layer cake all to myself!
Just TRI it!
Over the weekend, I was not as active in my sewing adventures because I had an extremely busy weekend filled with everything TRIATHLON!  How and why would someone do a triathlon?  Well, I’m glad you asked…

Finishing my triathlon with my prima ballerina cheering me on at the bottom

After I had my first beautiful daughter, my sister and I started to embark on fun little activities as a sort of challenge to ourselves and a bonding experience.  We used to run in the Firecracker 5k every year as a tradition, but never really trained for anything beyond that.  I have no idea why, but I said one winter that I’d love to do a triathlon and my sister agreed (I’m not sure if it was reluctantly or not, but I don’t think she was mutually excited).  We joined the local YMCA and found a beginners triathlon class for the biking and the swimming.  We were going to take this course for 8 weeks and then go on our own.  Why would we need to keep taking classes?

We asked questions from the other attendants in the class and the instructor.  Then we started talking about everyone’s lives, every day activities, etc.  Something odd started happening…friendships!  I enjoyed going to class every week to talk with these people. 

They talked my sister into a half marathon.  I thought, well that’s silly.  Who would run 13.1 miles?  I went to cheer everyone on and had such a great time, admittedly a little jealous that she achieved this awesome goal while I sat and watched.  We were hooked into this group and stayed in the class.

Daily I went home, telling my hubby about the people in the classes, the next events, and the conversations that left a certain VERY UNDERSTANDING man biting his lip on several occassions in what I can only think of as embarassing to listen to (women – if you have ever cycled, you know what I’m talking about).  My hubby kept hearing about these people and decided to join in on the next Firecracker 5k that the group did.  All these people who only really knew him as my husband, now supported his journey from the sidelines to the finish line.

Then finally came my day.  My FIRST triathlon.  I was nervous.  Swimming half a mile, biking 12 miles, and running 3.1 miles.  My sister ended up unable to compete, but she came at the crack of dawn, along with my cheering section, to wish me luck.

some of my cheering section

I FINISHED! 

I ended up doing 3 triathlons that year, 1 last year, and will do 2 this year.

Triathlon Group-Kenosha

More than that, though, I made AMAZING friends in all of this.  2 1/2 years later, a great deal has changed in my life.  That triathlon class has turned into a terrific group that supports all sorts of activities called Triathlon Group-Kenosha. My husband has turned from a person that thought anyone doing more than a 5k was crazy, to running in marathons and completed his first triathlon last year!  I kept up exercising throughout my second pregnancy (which I definitely did not do with my first) and had my second child, got back into training, and completed the Chicago Marathon 5 months after having her.  Yes, me, who thought my sister was silly for running half of that only a year earlier…  And now someone that is a crafting machine that started her own little business.

I am so grateful for people in my life now.  They have pushed me to becoming someone I never thought I would be or COULD be.  Someone who can TRI!  If it’s a race or a sewing project, I’ve learned that anything in life is possible, if you just TRY.